How to Add a Network to MetaMask (EVM Chains & More)
Summary: MetaMask is a multichain crypto wallet that allows you to connect with Ethereum, Layer 2s, Solana, and Bitcoin ecosystems directly through a single secure interface.
MetaMask users can integrate new chains by utilizing the automated ChainList tool or entering the specific RPC details manually to access various decentralized finance applications.

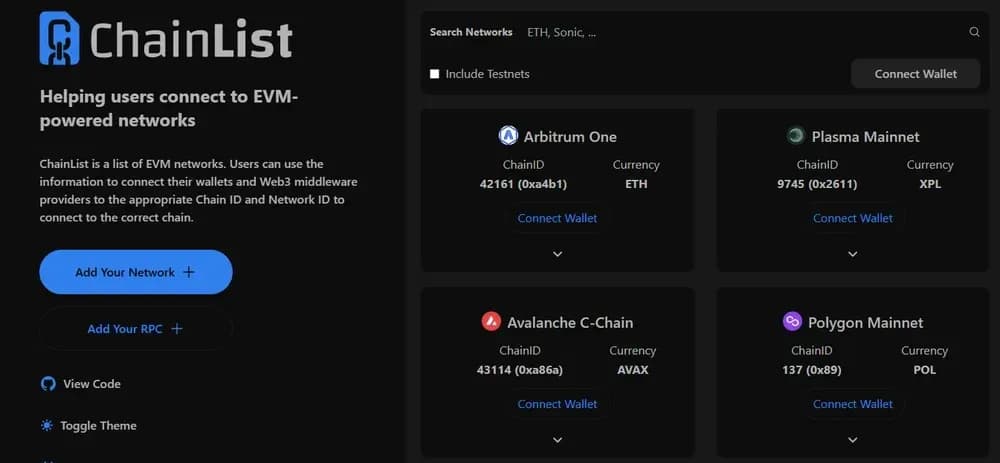
ChainList Overview
ChainList is the most trusted aggregator of EVM-based Layer 1 and 2 networks. It allows users to instantly connect their MetaMask to verified Chain and Network IDs, ensuring a safe connection.
Supported Networks
100+ Layer 1 and Layer 2 chains
Development Team
Built by the Defillama team
Compatible Wallets
MetaMask only
Can I Add a Custom Network to MetaMask?
Yes, you can add a custom network to MetaMask, but this applies mainly to EVM-compatible chains such as Polygon, BNB Smart Chain, Avalanche, Base, Arbitrum, and similar ecosystems rather than every blockchain available today in the wallet.
MetaMask also natively supports Solana and Bitcoin, while many other non-EVM networks are accessed through Snaps instead of the standard custom RPC form that users rely on for EVM additions inside settings menus today.
How to Add a Network to MetaMask
For most EVM chains, ChainList is the quickest way to add a network because it fills the required details automatically inside MetaMask.
Follow these simple ChainList setup steps below:
- Open ChainList: Go to ChainList's website and connect your MetaMask wallet and approve the connection so the site can detect the account you want to use.
- Find the chain: Search for the network by name or chain ID, then compare the details with official project documentation before adding it.
- Review the entry: Click Add Chain beside the correct listing, then review the network name, RPC URL, chain ID, and currency symbol carefully.
- Confirm in wallet: Confirm the request inside MetaMask, and the wallet will save the network so you can switch to it later.
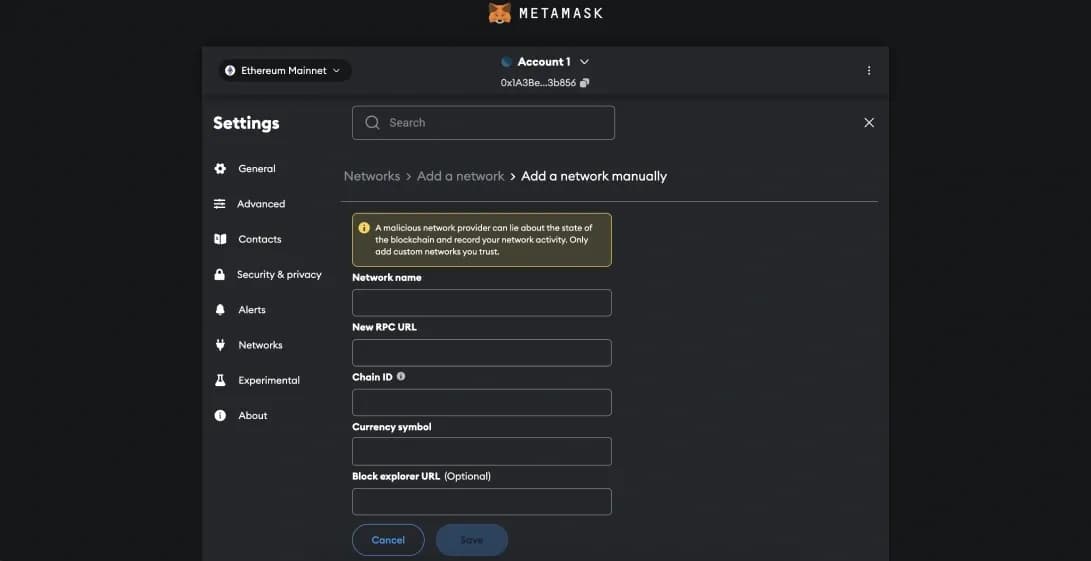
How to Manually Add a MetaMask Network
Manual setup is useful when ChainList does not list a network or when you prefer entering verified RPC information directly in MetaMask.
Enter each verified network detail carefully here:
- Open network settings: Open MetaMask through your extension or mobile app, go to Networks or Network settings, and choose Add a custom network to start entering details.
- Fill core fields: Type the network name, RPC URL, and chain ID exactly as published by the blockchain’s official documentation.
- Add optional details: Add the native currency symbol and, if available, the block explorer URL to make balances and transactions easier to read.
- Save and test: Save the network, then switch to it and test basic functionality only after double-checking every field for accuracy.
How Many Networks Does MetaMask Support?
MetaMask does not publish a small fixed cap for everyday users; instead, it supports its built-in networks, many custom EVM networks, native Solana and Bitcoin, and additional non-EVM access through compatible Snaps in the extension and mobile app.
In practice, support depends on the network type: EVM chains are usually added by RPC details, Solana and Bitcoin work natively, and chains like Cosmos or Sui may require a third-party Snap to connect and sign transactions.
Can I Add Multiple Networks to MetaMask?
Yes, MetaMask lets you keep multiple networks enabled at once, and its multichain interface can display assets across them, while connected dApps can still use different networks simultaneously without requiring you to remove previously added chains from the wallet.
Things to be careful about:
- RPC Security: Only use RPC URLs from trusted sources because malicious providers can track your IP address or fake your account balances.
- Direct Transfers: Never send funds directly between different chains because moving assets from Ethereum to Solana requires a bridge to avoid loss.
- Fake Directories: Ensure you are using the official ChainList website to avoid phishing attacks that might provide you with incorrect blockchain data.
- Snap Permissions: Review the specific permissions for every Snap you install for Bitcoin or other chains to protect your 12-word recovery phrase.
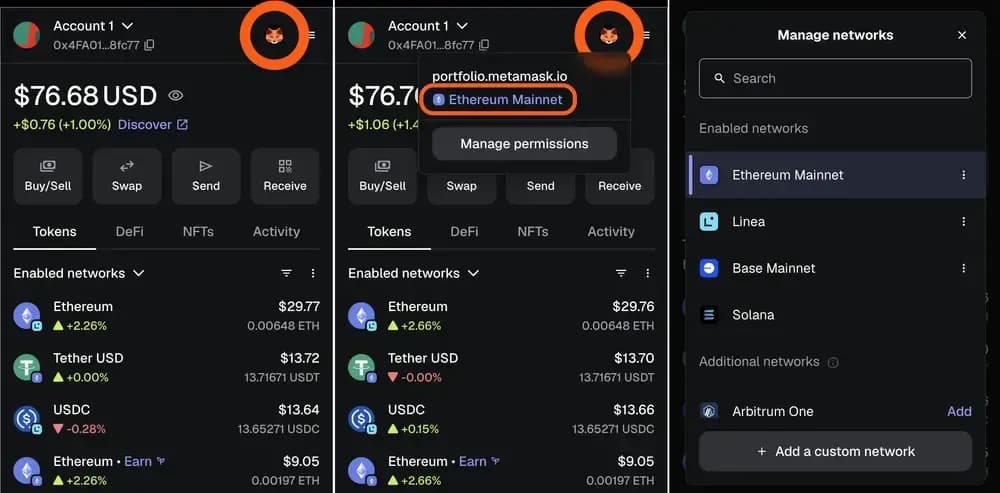
How to Change Networks in MetaMask
Changing networks in MetaMask is simple, but the exact flow depends on whether you want to filter portfolio assets or switch a connected dApp.
Use this quick network switching sequence below:
- Open the selector: Open MetaMask and locate the network area from the home or tokens screen, where enabled networks are listed clearly.
- Filter asset view: To filter assets, open Enabled networks and check only the chains you want displayed in your portfolio view.
- Switch dApp chain: To switch a connected dApp, click the dApp icon, select the active network, and choose another supported network.
- Complete the change: If the dApp supports that chain, MetaMask switches automatically; if not, you may need to add or enable it first.
About MetaMask
MetaMask is a self-custodial crypto wallet and gateway to onchain apps, available through browser extension, mobile app, and web experiences for managing assets, swaps, permissions, and multichain activity across Ethereum-compatible blockchain and newer supported networks today.
Originally focused on Ethereum, the wallet now includes native support for Solana and Bitcoin, while Snaps extend functionality to many additional non-EVM ecosystems and specialized security or interoperability features built by third-party developers through the official directory.
Final Thoughts
Adding a network to MetaMask is easy when you verify the details first, because convenience matters less than avoiding malicious or incorrect RPC settings.
ChainList speeds up EVM setup, but knowing when to use native Bitcoin or Solana support, manual entry, or Snaps gives you better control overall.
Frequently asked questions